SnapBuddy
About
SnapBuddy is an affordable way to capture time-lapse images of your plants using the popular ESP32 AI Thinker Cam. The OV2640 camera comes with the AI Thinker Cam. The OV2640 is a 2-megapixel camera that supports various output formats, including JPEG and YUV. It has low power consumption and supports image sizes from QQVGA to UXGA.
Wonderfully, Tasmota has a build for the ESP32-Cam, which is what SnapBuddy uses.
Warning
Under Construction
Let’s Make One
Gather The Materials
FTDI/RS232 <-> USB adapter board
AI Thinker ESP32-CAM
micro USB BoB (TODO: Get more info…)
Install Tasmota
SnapBuddy, like SnifferBuddy and MistBuddy’s smart plugs, utilizes Tasmota to enable time-lapse functionality. However, instead of attaching a sensor to a Wemos D1 ESP286 and installing a sensor build, SnapBuddy utilizes the ESP32-CAM’s built-in Tasmota build. The steps to install Tasmota on the AI Thinker ESP-32 are detailed in the Tasmota section, including instructions for both general installations (indicated by the North Star icon ) and those specific to the ESP32-CAM (indicated by the camera icon ).
Summary
Follow Tasmota Install Steps for both .
Follow Tasmota Install Steps for ESP32-CAM .
Follow Tasmota Install Steps for Sensors .
Make the Enclosure
…
Put Together
Software
The Tasmota ESP32-CAM build is used
USB -> FTDI -> ESP32
The AI Thinker ESP32 does not have native USB support. We need to use an FTDI USB to Serial adapter board like the one linked here to translate the RS232 serial communication into a format that our computer can understand.
Set Up Windows Drivers
Assuming you are on a Windows 10 PC (I say this because it is what I am running), follow the steps outlined in Darren Robinson’s article, ESP32 Com Port – CP2102 USB to UART Bridge Controller.
Connect the FTDI adapter board
Here’s the FTDI adapter board I used. There are many different boards available. The setup should be the same.
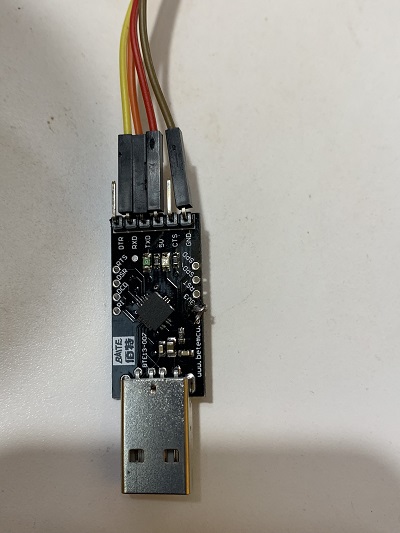
FTDI Adapter Board
and
FTDI Adapter Board
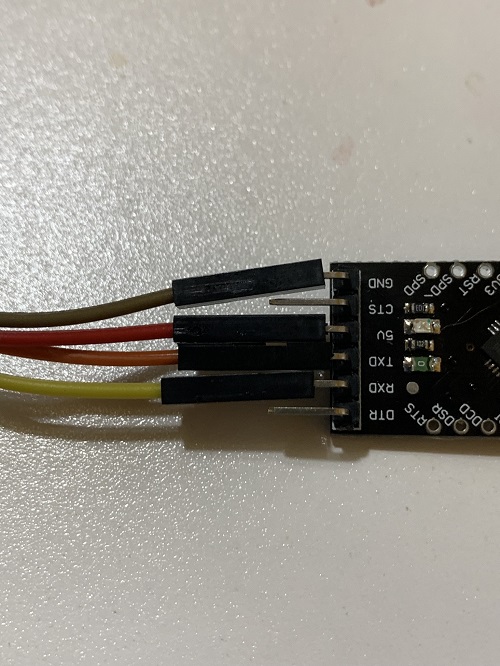
Here’s how the wiring looks from the ESP32:

AI Thinker Cam Pinout
FTDI Wiring to AI Thinker Wiring
wire color |
FTDI pin |
ESP32-CAM pin |
|---|---|---|
yellow |
RXD |
U0T |
orange or green |
TXD |
U0R |
red |
5V |
5V |
black |
GND |
GND |
To upload the code to the ESP32 Cam, you will need to connect the GPIO0 pin to GND. This will put the device into flashing mode, allowing you to write the code to the ESP32 Cam.
Uploading Code
Time to upload some .ino file. The thing to keep in mind is getting the ESP32Cam in and out of the ability to upload code versus running code. To upload code:
Make sure the GPIO 0 pin is tied down to GND.
Hit the RST button.
The code should upload at the point
Running code
Disconnect the GPIOP0 to GND wire (this takes the ESP32Cam out of Flashing (i.e.: code uploading) mode).
Hit the RST button.
If the code has
Serial.println()statements, these should show up in the Serial Monitor.
Image Size and Format
I asked chatGPT, What image size and format is typically used as input into a CNN?
The response: Some common image sizes for use in CNNs include 256x256, 224x224, and 227x227 pixels. These sizes are small enough to allow the model to process the images efficiently, while still providing sufficient resolution for the CNN to extract useful features from the images. In terms of image format, it is generally best to use image files in a lossless format, such as PNG or TIFF, when training a CNN. These formats allow you to preserve the original quality of the images, which is important for maintaining the integrity of the data
Based on this insight, images will be stored on Gus with a size of 256 x 256 and in png format.
The camera on the AI Thinker is the OV2640. The supported image formats are: PIXFORMAT_YUV422 PIXFORMAT_GRAYSCALE PIXFORMAT_RGB565 PIXFORMAT_JPEG
Since png is not one of the choice, we will use JPEG as the image format.
The frame size can be set to one of: FRAMESIZE_UXGA (1600 x 1200) FRAMESIZE_QVGA (320 x 240) FRAMESIZE_CIF (352 x 288) FRAMESIZE_VGA (640 x 480) FRAMESIZE_SVGA (800 x 600) FRAMESIZE_XGA (1024 x 768) FRAMESIZE_SXGA (1280 x 1024)
The closest fit is FRAMESIZE_QVGA
initCamera.cpp and initCamera.h are all the parameters and initialization of the camera.
setup
enable brownout detection…. doc see -= https://iotespresso.com/how-to-disable-brownout-detector-in-esp32-in-arduino/ The soc.h file contains the WRITE_PERI_REG() function, and the rtc_cntl_reg.h contains the RTC_CNTL_BROWN_OUT_REG register.
I am using the settings for the AI Thinker ESP32-CAM. One thing that we might want to change is the image quality or perhaps the pixel format. The constants are defined in espressif’s esp32-camera file sensor.h.
FTP on Arduino requires installing esp32_ftpclient. Clicking on the documentation link leads to here - a github.